The Art of Refinement: Giving Bamboo a Warm Walnut Glow
When I sourced bamboo furniture for a client’s redesign, I knew it had the right form and function: modular, minimal, and perfectly suited to the mid-century-inspired vision for the space. But the cool, blond bamboo finish felt out of step with the warmth and depth the design needed.
Particularly for the rail-mounting shelving system, authentic mid-century sets often cost thousands of dollars, so refinishing this affordable alternative became an opportunity — saving the client money and stretching my own skills.
It was my first time attempting to stain any furniture piece. Because bamboo is technically a grass, not a wood, the learning curve was even steeper. Most tutorials on furniture staining don’t apply neatly to bamboo — its structure, density, and natural luster make it behave differently than wood when sanded or stained.
This project required not only learning from others but also troubleshooting through research, patience, and trial to find the right approach.
The Challenge
My challenge was to create a finish with the tonal richness of walnut across a mixed set of materials while respecting their limits. The IKEA Svalnäs system, which compromised the bulk of this project, is a perfect example of a mixed-material challenge. My goal was to achieve a uniform, rich color on pieces with fundamentally different internal constructions. This required additional research and devising a different approach for handling the two primary types of materials.
The Vision
The goal was to capture the warmth of true mid-century modern furnishings — that rich, honeyed walnut tone that feels both timeless and grounding — while preserving the natural texture and linear grain of the bamboo.
It was a delicate balance: I wanted to maintain enough of the bamboo’s organic character to feel honest to the material, but soften its more distinct linear grain to create a subtle wood grain finish of wood furniture.. The end result needed to blend seamlessly with the space’s brass accents, olive and ochre hues, and tactile, layered design.
“As my first staining project, this process was as much about sensitivity as it was about skill. Bamboo may be a grass, but when handled carefully, it can take on the warmth and refinement of real walnut.”
The Transformation
Step 1: Identifying and Testing
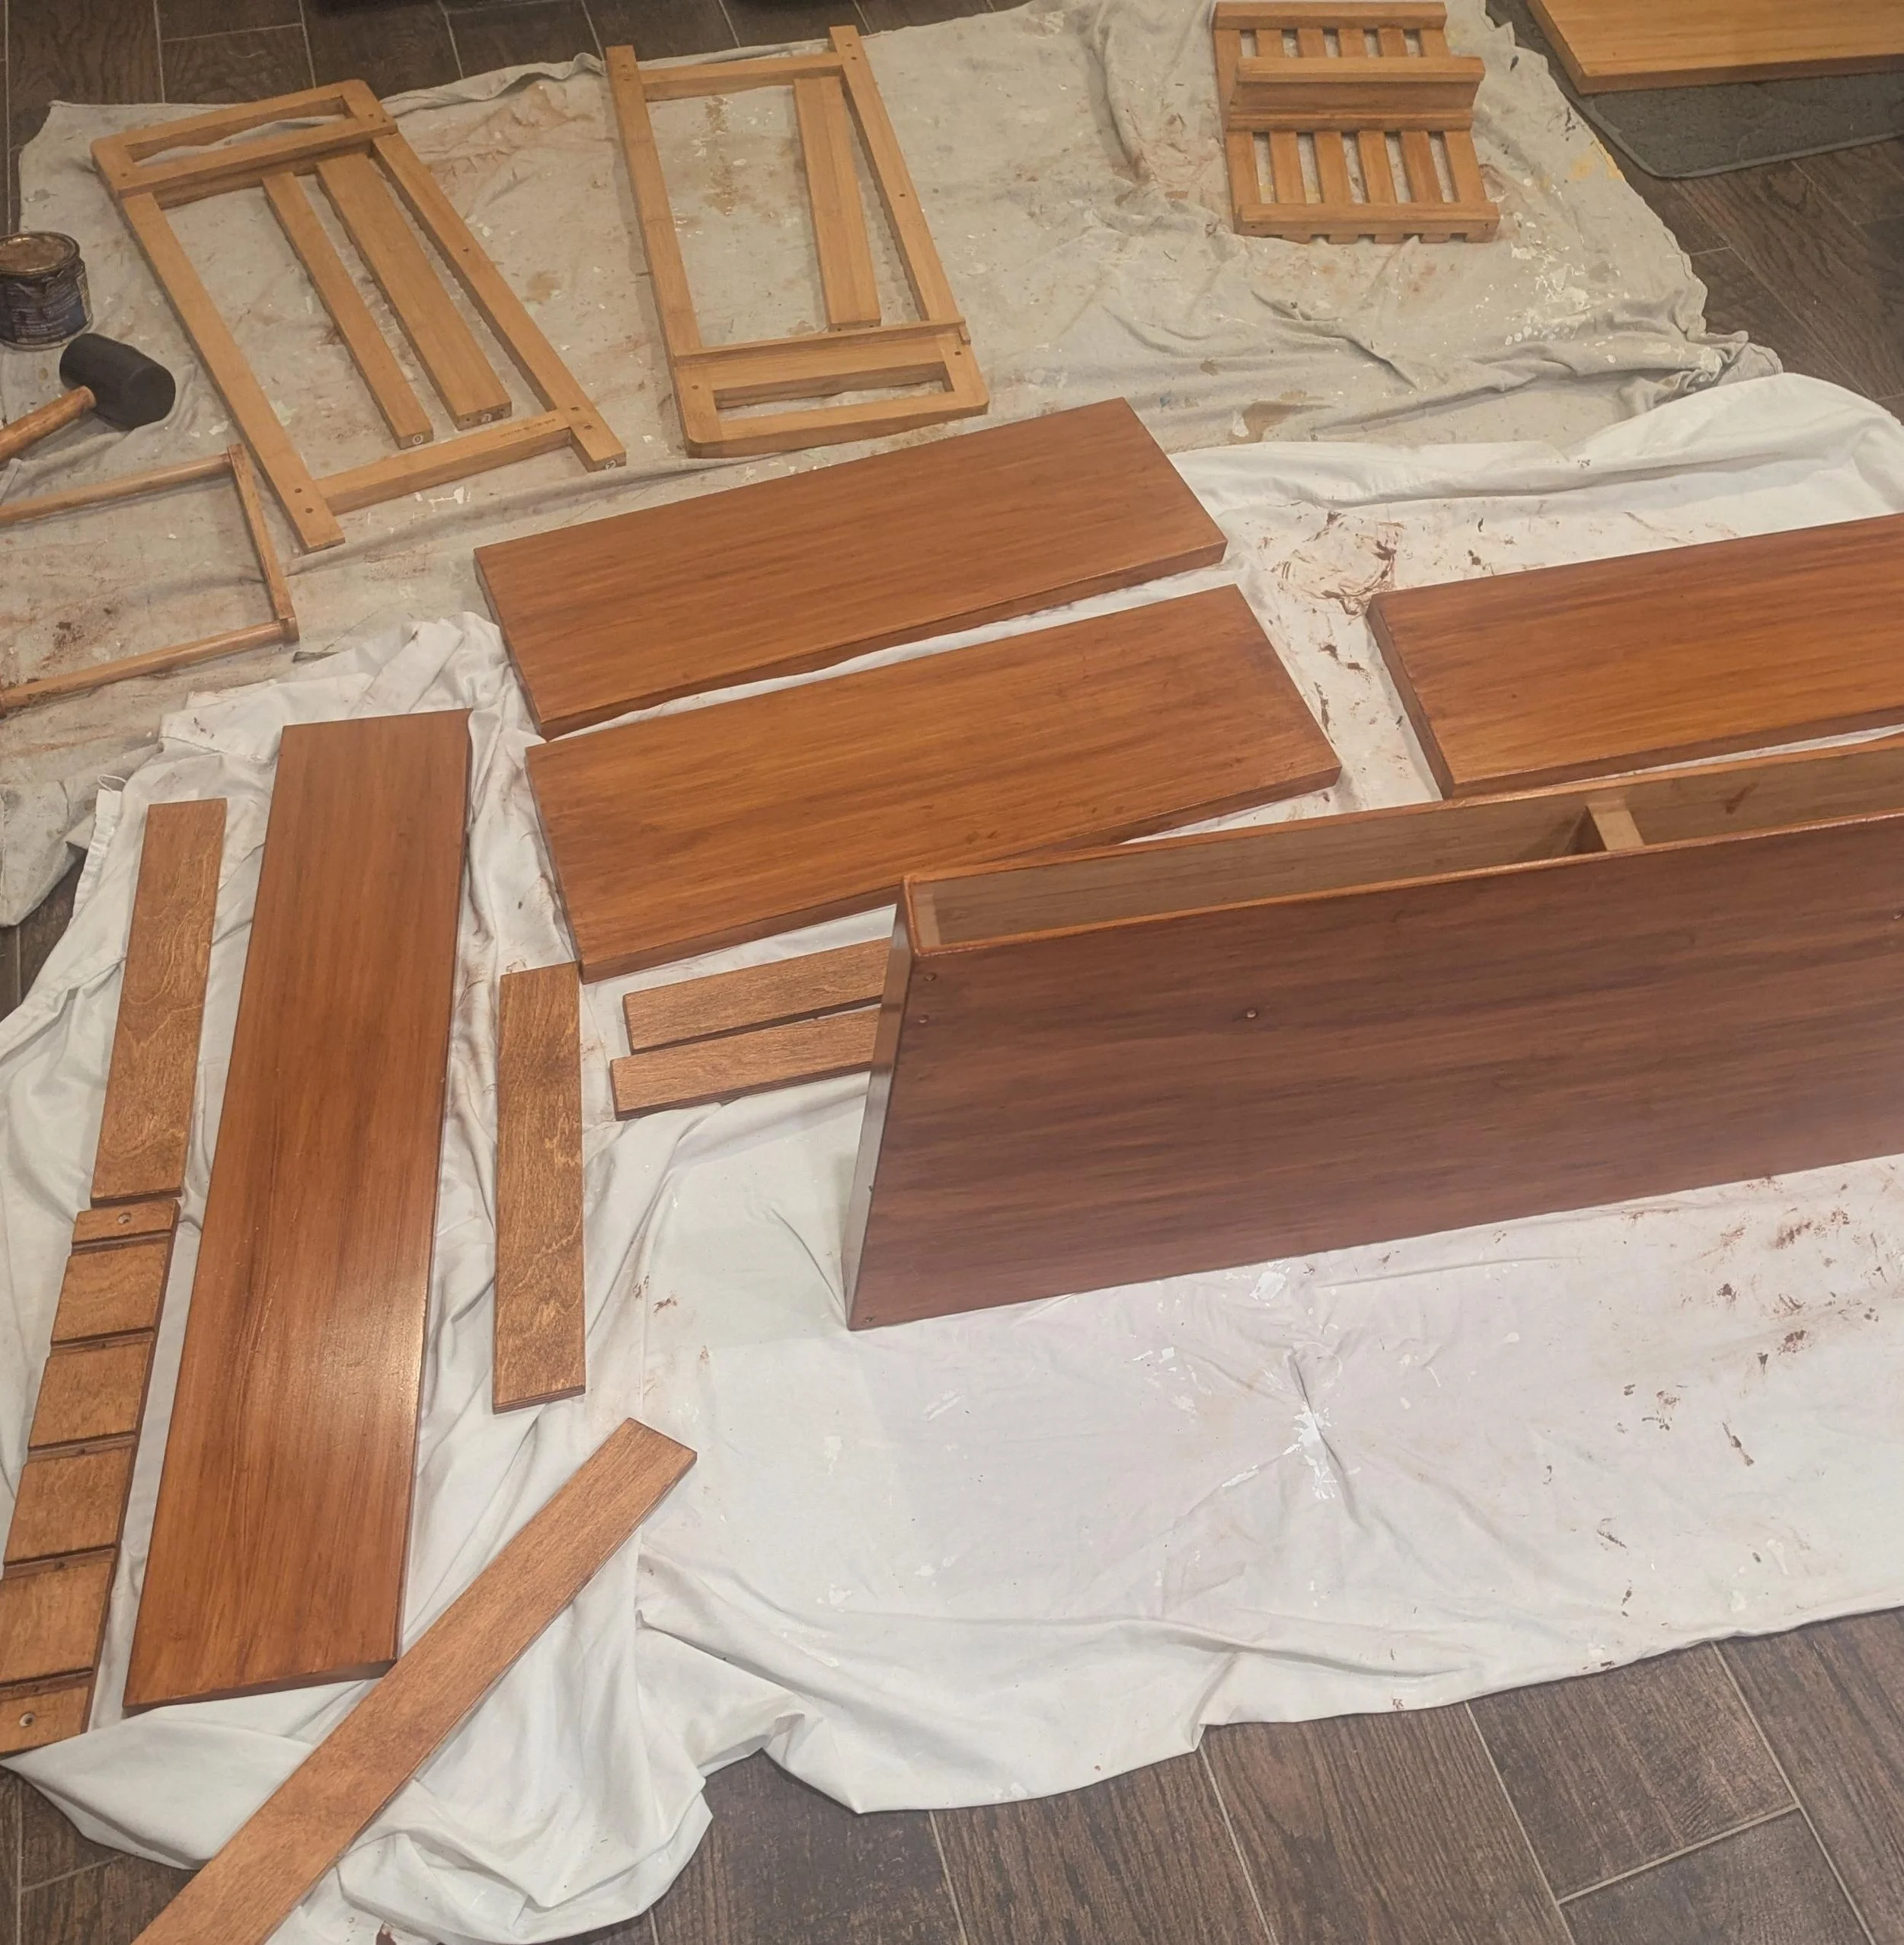
At the start of the project, I had to determine which pieces were solid bamboo and which were bamboo veneer. I researched how to differentiate between solid bamboo and bamboo veneer over engineered wood. I found that the two types varied subtly in density, weight, and the structure of their screw holes.
The solid bamboo pieces felt denser and heavier.
Veneer panels were lighter, with smoother screw-hole interiors indicating a layered substructure.
Specific to the components of the IKEA SVALNÄS system, I reviewed the product listing information and my own observations of the parts to reach the following conclusions:
| Svalnäs Component | Construction Type | Key Observation | Technical Term for Staining |
|---|---|---|---|
| Shelves | Hollow-core with thin bamboo skin | Very light; easy to strip screw holes; felt hollow inside. | Bamboo Veneer over Hollow Core |
| Rails & Cabinet Frame | Solid laminated bamboo or thick plywood core | Heavy; dense; held screws securely. | Solid Laminated Bamboo/Plywood Core |
To achieve a consistent, non-blotchy finish across these two distinct material types, I had to employ a differential preparation strategy—a method that treats the veneer and the solid bamboo differently before the stain is even applied.
Step 2: Sanding — by Hand
Once I sorted the different types of materials and wiped them down, I chose to sand the bamboo pieces entirely by hand. Hand sanding gave me the control to work slowly and intentionally, especially on the veneer panels where restraint mattered most. The goal was to create a receptive surface for the stain while preserving bamboo’s natural pattern and texture.
As with wood, I progressively increased the grit of sandpaper to remove any manufacturer finish and create smooth finish, sanding in the same direction as the bamboo grain.
The sanding process for each type of material was tailored to the material's fragility and density. This is a critical step to ensure optimal stain absorption without damaging the thin veneer.
Solid Laminated Bamboo pieces: I gently sanded to a final sandpaper grade of 220-grit. This was necessary to break through the hard, dense outer layer of the bamboo and open the grain enough for the stain to penetrate
Bamboo Veneer over Hollow Core pieces: I performed only a light scuff-sanding with 320-grit sandpaper, just enough to dull the factory sheen without thinning the veneer. This was a safety measure to prevent "sanding through" the extremely thin veneer layer.
After sanding, the surface should be subtly velvety. I wiped the surface clean with a clean microfiber cloth dampened with mineral spirits to remove sanding dust.
Step 3: Prepping for Consistency
The next critical step was the use of a chemical surface preparation, which was also applied differentially. This technique was developed through trial and error to manage the material's varying porosity.
Solid Laminated Bamboo pieces: I skipped applying any type of pre-stain product. I was concerned that the dense material would have been blocked by the conditioner, requiring unnecessary extra coats.
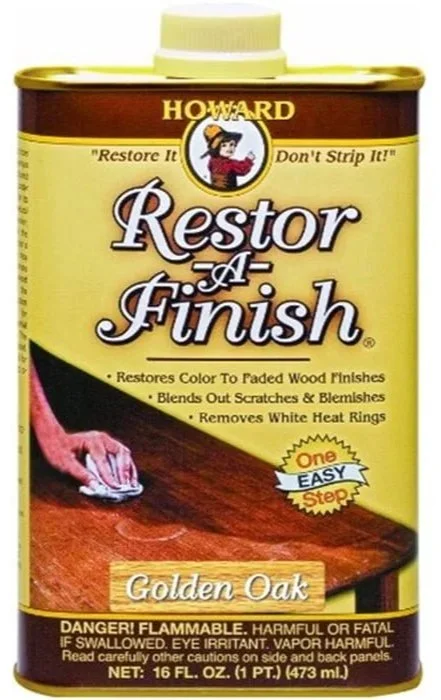
Bamboo Veneer over Hollow Core pieces: I applied Howard Restor-A-Finish. In truth, my choice of Howard Restor-A-Finish for the veneer was an accident. As a novice, I was looking for a pre-stain wood conditioner at the hardware store and simply grabbed the wrong product. Restor-A-Finish is designed to restore the finish on existing wood, not prepare raw wood for staining. However, this mistake turned into a happy accident that highlights the technical challenge of working with factory-finished veneer.
The product works by chemically softening the existing finish just enough that it can be spread around to eliminate scratches and other minor blemishes. On the factory-finished veneer, this "softening" action appears to have created a uniform, slightly tacky surface for the gel stain to adhere to. It may have acted as a chemical surface prep by providing the gel stain could grab onto the veneer evenly, which is why I avoided the blotching that a traditional stain would have caused.
So, while I don't recommend intentionally using the wrong product, my mistake proved that a chemical prep that slightly compromises the factory finish contributes to successfully staining bamboo veneer.
Note on Coats: Using the conditioner on the veneer meant generally required me to apply four coats of stain to achieve the final color depth, compared to only three coats on the unconditioned solid bamboo. This trade-off was necessary for color consistency across the IKEA SVALNÄS system.
Step 4: Staining
I chose General Finishes Candlelite Gel Stain. Gel stains are thick and non-penetrating, essentially acting like a thin layer of paint that sits on the surface, which is ideal for the non-porous nature of bamboo. In contrast, traditional liquid stains rely on soaking into the wood fibers. Since bamboo is so dense, it absorbs the stain unevenly, leading to blotching. Gel stain, by contrast, sits on the surface and is wiped off, allowing you to control the color and achieve a uniform look regardless of the material's inconsistent absorption rate. This was the key to achieving a consistent tone across both the solid and veneered parts.
Though it’s a pricier product, a single pint was all I needed to stain 9 rails, 2 desks, 1 cabinet, and 17 shelves from the IKEA SVALNÄS system plus a bamboo hamper and a couple of easel bases for other parts of the redesign. To find the right shade of stain, I tested a couple of stains on an inconspicuous, unfinished part of a floating pine shelf I mounted in the room with the color I wanted to match for this project. One coat of Candlelight shade on unfinished pine was a near perfect match!
I applied with a microfiber cloth for control and smooth blending. I applied thin even coats in the direction of the grain, working in small sections so the stain doesn’t dry before wiping off the excess. The gel formula allowed me to work slowly and build color gradually, which was ideal for a first-time project.
Since we had guests staying in our lower level during the first week of staining,, I worked outdoors in humid D.C. summer weather so I had to allow for generous drying time between coats, sometimes up to 24 hours, to ensure the stain cured evenly. Make sure the surface feels dry and not tacky before applying the next coat.
Because of bamboo’s natural oils, it takes multiple coats to achieve the same shade that could be achieved with one coat on unfinished pine:
First coat: established the warm undertone.
Second coat: deepened and balanced color across pieces.
Third and fourth coats: unified the overall tone, giving the bamboo a soft walnut warmth.

Step 5: Finishing
Once the final coat cured, I applied a couple of thin layers of matte finish water-based polyurethane using a foam roller. I made this choice based on a few reasons:
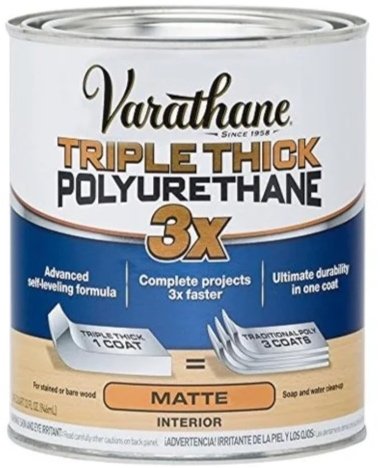
Durability: As this piece is a desk/workspace, it needed scratch and stain resistance. The 3x thicker formula is advertised to provide the durability of three traditional coats in a single application.
Aesthetic: The clear matte finish was chosen specifically to protect the color without adding the yellowing tint that oil-based polyurethanes can introduce, preserving the rich walnut tone achieved with the gel stain.
Compatibility: Water-based polyurethanes are fully compatible with gel stains (which are typically oil-based) once the stain has fully cured, and they offer fast drying times and easy soap-and-water cleanup. This final layer protects the stain and gives the piece a professional, lasting finish.
This sealed the surface while preserving a subtle, hand-finished glow — not glossy, just quietly luminous.
Design Notes
-
-
Ambient Building Products. How to Stain and Finish Bamboo Plywood.
Bamboo Furniture talk - Staining Bamboo: A Complete Professional Guide
Glencairn Furniture - Veneer Versus Solid Wood Furniture: Myths, Mistakes and More
General Finishes. How to Prep Wood For Stain: Sanding, Cleaning & Color
Oakwood Veneer - Staining Wood Veneer: A Comprehensive Guide
Salvaged Inspirations - How To Apply Gel Stain to FINISHED Wood
Lessons Learned
Material identification matters. Weight, density, and screw-hole structure reveal composition.
Hand sanding builds awareness. When veneer is prepped enough, stop before you go too far.
A Chemical Surface Prep prevents blotching of veneer. It evens absorption on unevenly sanded veneer.
Layering builds richness. For bamboo, three to four thin coats yield the light walnut tone while preserving and softening the native bamboo grain to create more of a wood grain texture.
Patience is the hidden skill. Extra drying time produces a smoother, more professional finish.
The visual evidence of the finished piece confirms that this differential approach is the correct path for any DIYer tackling a mixed-material bamboo project.
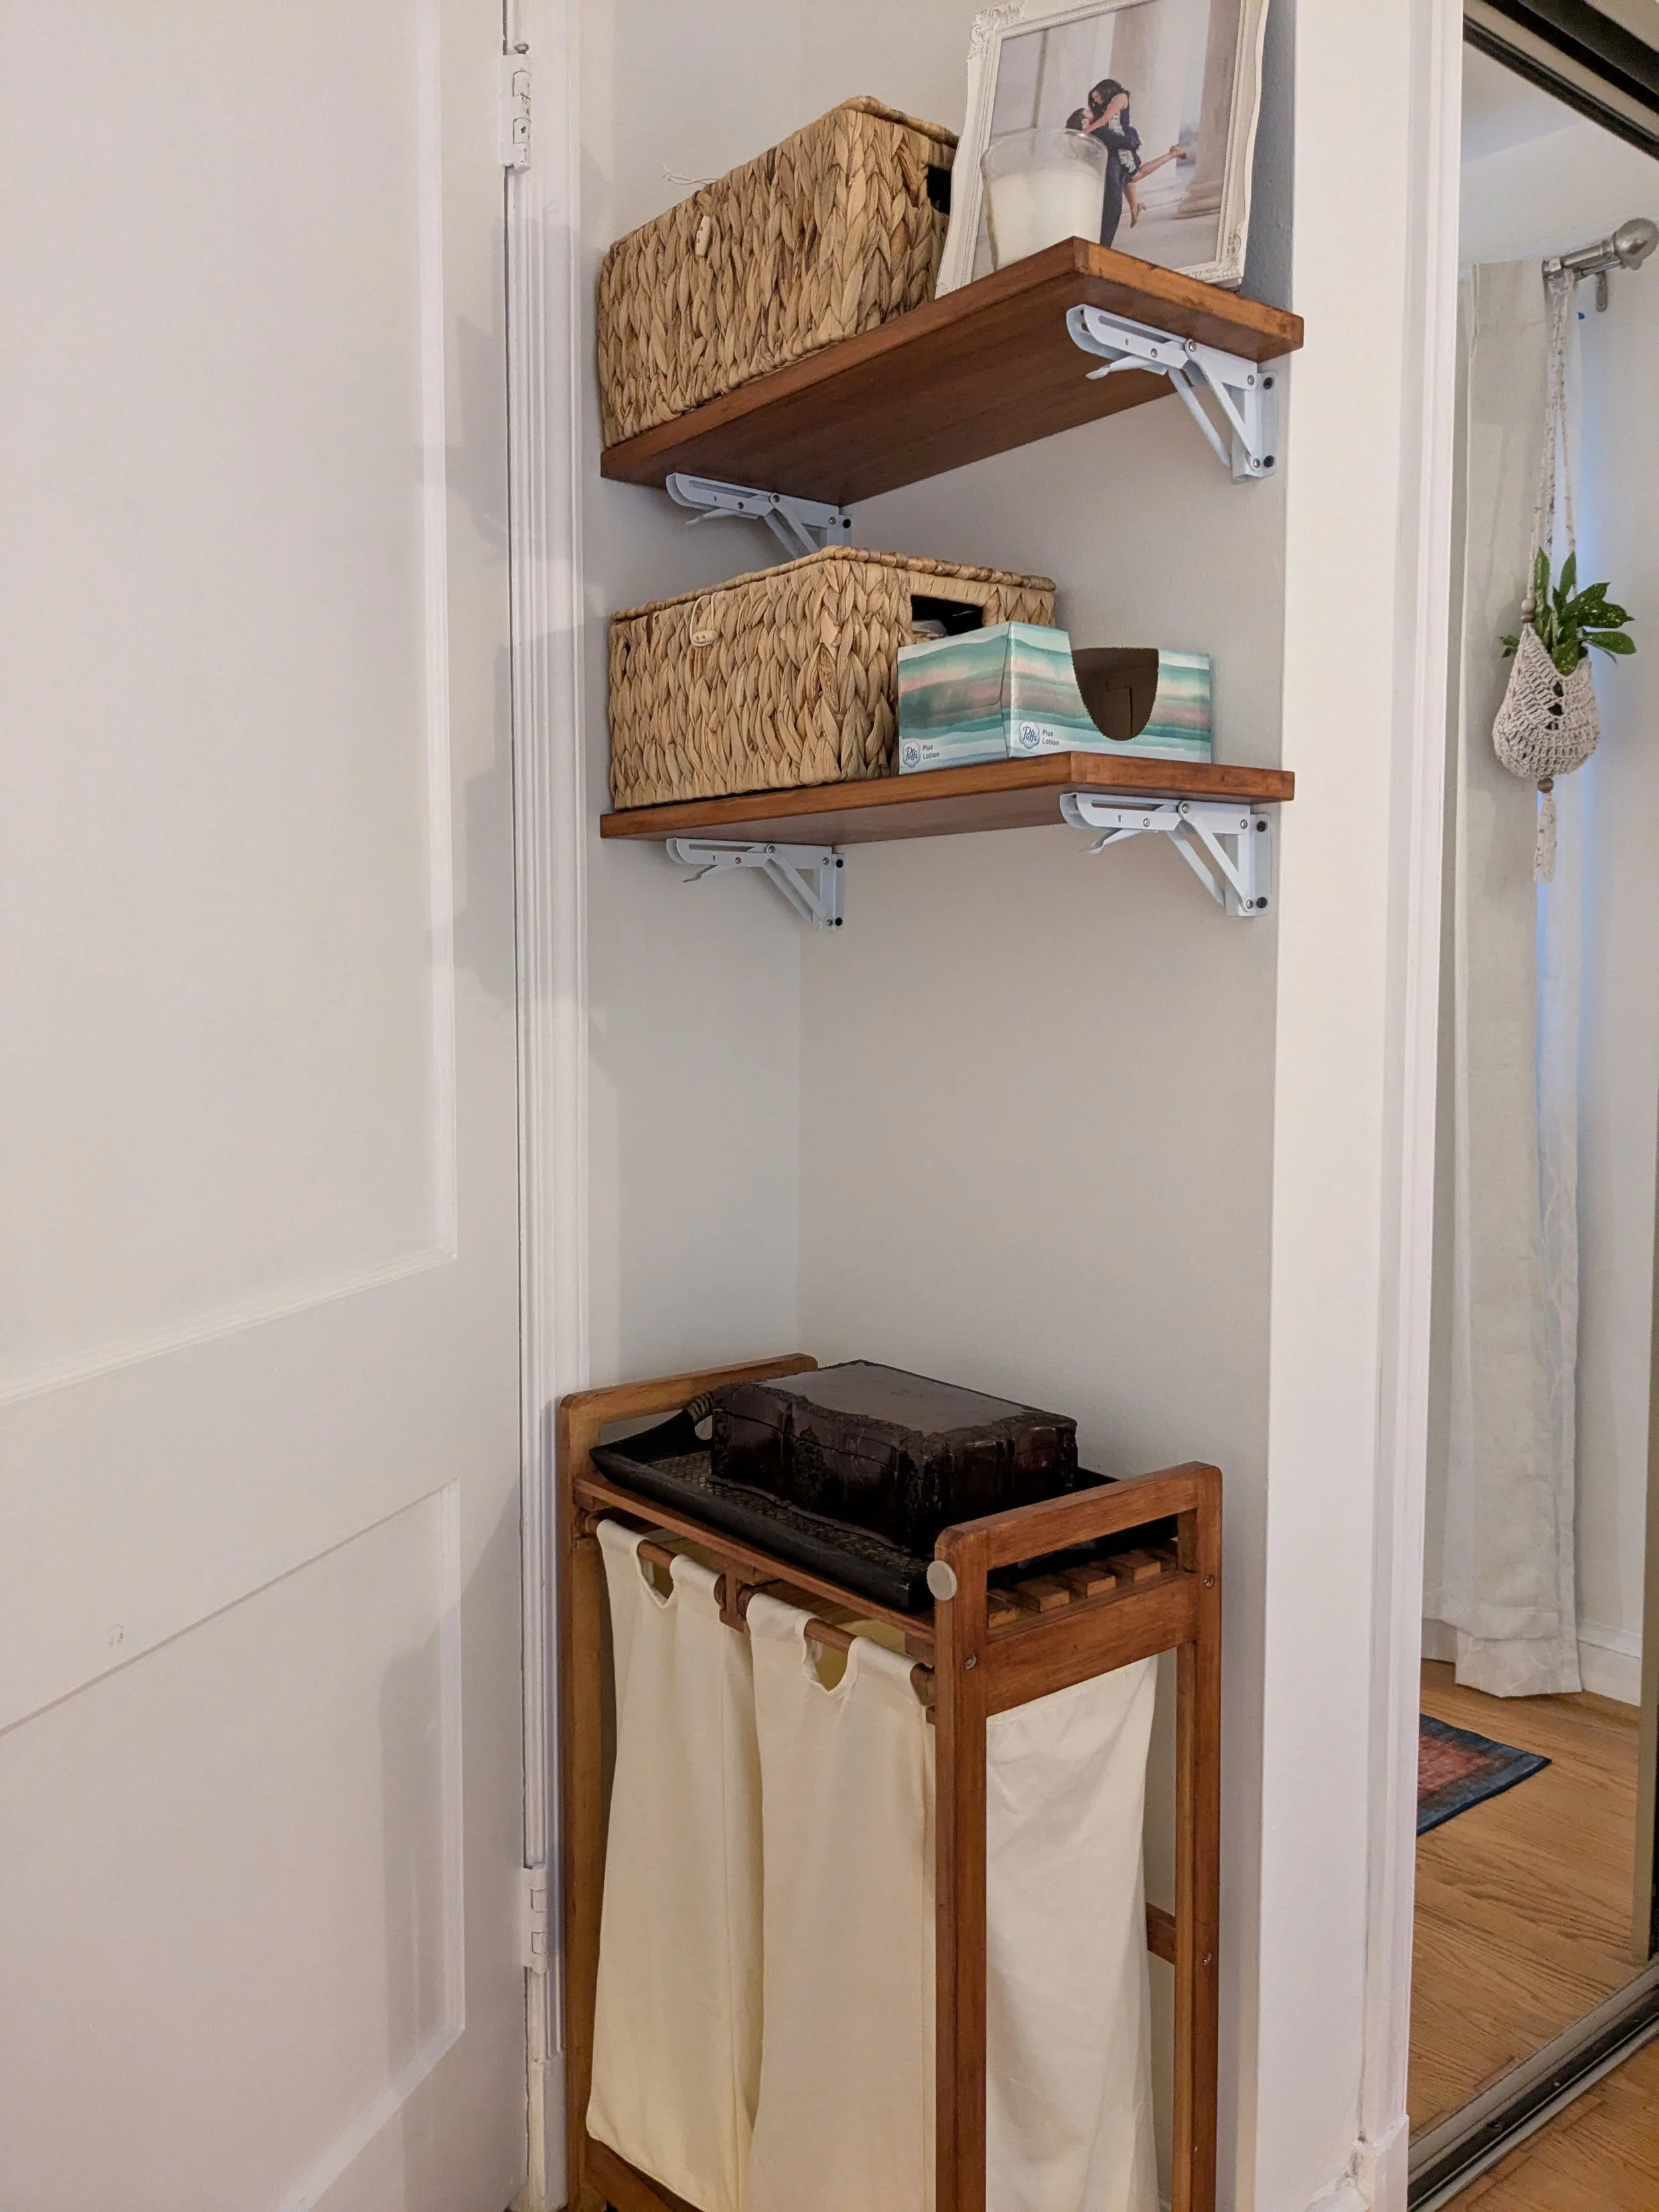
The Result
The final result—a uniform, rich, warm walnut glow across the entire Svalnäs system—validates the importance of understanding the material. By treating the solid and veneered components differently, I was able to successfully overcome the technical challenges of staining bamboo and achieve the high-end aesthetic the design required.
The refinished bamboo furniture became the visual and functional centerpiece of the dual-purpose office and guestroom and blended in well with the bedroom redesign. Its new walnut tone anchored the space’s palette of olive, brass, and natural textures — blending seamlessly with both its modern lines and mid-century spirit.
What began as a budget-friendly experiment became one of the project’s defining details and a personal reminder of the importance of curiosity and care in this type of work. Even as a first attempt, careful preparation and restraint can yield a finish that feels custom, warm, and enduring — a design success as much as a personal one.